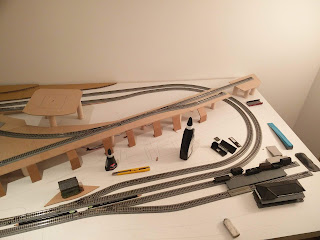
Not too much more to show at the moment. I've been adding cardboard supports for the hills that I will eventually be creating using plaster cloth. I added another small platform in the middle of the layout that will provide the base for a pagoda building, but it's not going to hold any track on it.
Our cat has certainly found a comfortable spot in spite of the layout getting more and more crowded.
Sunday, September 16, 2018
Wednesday, September 5, 2018
Track Complete!
With the addition of a small raised level in the corner of the layout, Taihoku 1937 is now track complete. Adding the supports to the wooden bridge went well, and it seems level, stable, and strong.
The rest of the upper level seems to have been fixed to the base surface quite well. No issues with movement yet.
I even started cutting out the planned pond, removing one layer of the hollow core door. Our cat also got involved in the photoshoot.
Next step is to connect all the feeder wires together into a single plug for the controller, then to start planning the terrain.
Saturday, September 1, 2018
Upper Level
I had a wooden bridge left over from the last iteration of the layout, and I wanted to use it again, but unitrack is sold with a molded plastic ballast already attached, which would not make sense for a wooden bridge. So I built my own: I removed two rails from a spare piece of straight Unitrack, used two short pieces on each end to make sure the gauge was right, and glued it to the top of the wooden bridge as so:
I wasn't sure it would work, but it ended up bring exactly in gauge and seemingly strong enough so that the rails won't become detached from the bridge.
I built an MDF base for the raised level of the layout, cutting it to fit the sections of track that are planned for that level. I only had A4-sized sheets of MDF to work with, so each piece was connected to its neighbour with a small overlapping tab glued to the underside of the base. Once the base was dry, I drilled holes for the one feeder track and two turnouts, and then nailed the track to the base to give it extra stability and so I was certain where the end that had to connect to the bridge would end up.
I used the same basic technique to raise it up as I had used on the ramp: balsa wood dowels cut to size (6 cm in this case) and placed around the base to support it. Below is a picture of the raise base before the columns were glued to the baseboard surface.
I've since attached the entire upper level to the baseboard, after placing the bridge piece in place to connect the ramp and the uppoer level. Next I'll need to cut and glue balsa supports for the bottom of the wooden bridge, since it's only suspended by the rail connectors for the moment.
Subscribe to:
Comments (Atom)


