Sunday, September 8, 2013

Ballasted

Ballasted the track on the upper level. Going to hold off on any further work until I get a few more buildings, freight offices and the like, for this area.


Last bit of track to finish is the siding leading into the mine area, which has a level crossing on a curved track.

Wednesday, August 28, 2013

Last of the Track

Realized a few things today:
  • I am not good at soldering
  • Soldering is always easier at a bench instead of on the layout
Ended up wiring the end of the track, but at the cost of melting some of the end of the track piece. In any case, the final piece of track is tacked down, the locomotive runs fairly smoothly all over the upper level, with all turnout configurations, and I'm ready for some more ballasting.


This could be extended in the future; I won't ballast around the end and will leave the track end piece on.


Tinycat seems to approve of the addition.

Sunday, August 25, 2013

Extending the Baseboard

To allow the locomotive to switch out the upper siding, I'm adding a small extension to the upper deck. It will also make it easier for me to add another feeder line to the upper track.


Once the wooden support dries I'll lay the track, wire it up, and test it out.

Thursday, August 1, 2013

More Green on the Station

Slow going recently, but the station area is starting to fill out, as is the freight depot.

Thursday, July 18, 2013

Station Grounds

Slowly adding green to the station grounds.


Sunday, July 14, 2013

Soldering Rails for Fun and Profit

I ran into a problem on the upper level after I added the new turnout. I used a few short pieces of settrack that I had left over, but the track connectors had become so bent that they snapped off, and I couldn't extracted the broken half. The result was that two of the rail connections were just touching without any support, and I found that if I ran the locomotive over them, it quickly lost power after passing over the unconnected joints.


So I decided to experiment with rail soldering. For my first time, I think I did alright. It had been years since I last used a soldering gun. I put some damp sponges beside the joint to help soak up some of the heat from the rails, but I did end up melting some of the plastic ties. Luckily it wasn't catastrophic. It doesn't look great from close up, but the joints should be much less visible once the rail is ballasted, and most importantly, now the loco runs great over it. I still need to add the pocket track extension, which will need another feeder line, but for now I've tried out a new skill and fixed another problem.


In other news, I'm slowly adding green to the hills. I've also put a black base coat on the rolling stock.

Thursday, July 11, 2013

Kabayama Station Lighting Test

Installed two of the three planned lights for the station building today. I've also done some work on the station area, plastering the landscape and laying down some greenery.


The barred windows give a nice effect on the surrounding area!

A couple notes:
- these lights are incandescent and get very hot very quickly
- they will never be left on unattended
- each one will eventually be fixed in place, leaving lots of air flow and space around them

I think for the future I'll look into an LED system, I'd just feel much safer with lights that give off next to no waste heat.

Sunday, July 7, 2013

Layout Tour and Plans

Since I'm restarting work on the layout, it's probably a good time to record the current status of different areas, and my plans for their future.

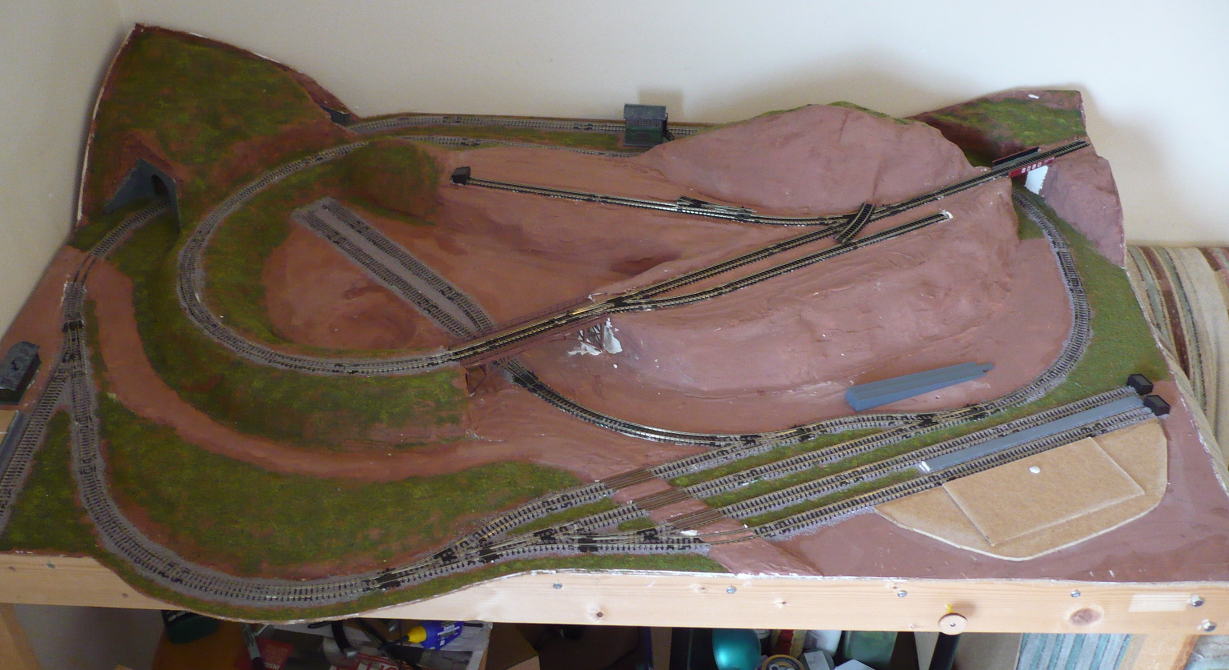
First, an overview image, unfortunately taken in very low light:


You can see the blur of a cat at the extreme right! Details on each numbered area follow.


1) "South" Tunnel Portal and Level crossing

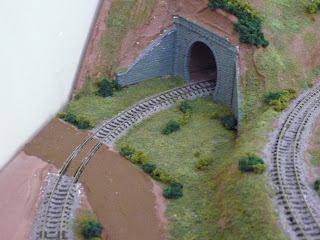
Still a lot of work to do weathering the portal and filling in the greenery, but this area is looking much more "finished" than any other on the layout. I might later add a fence near the bushes between the open space and the road. The crossing will get some rural signage and the whole road still needs a lot of work adding to the surface.


2) Freight Yard

This was originally supposed to be the entrance to a yard, but when I gave up on the small extension idea, it turned into this. The crane fits in well here, and I'm pleased with out the ballasting next to the platform worked out. The platform itself is unfinished because I ran out of that size of balsa wood! The freight office needs some detail around the base, but it has a light installed.


3) Main Yard and Level Crossings

These crossings turned out much better than I had anticipated. Still needs more foliage around the tracks, and a lot more detail in the yard area: signals, lights, signs. The unpainted area in the back is a bit of a puzzle to me. Not yet sure what should go there.


4) Kabayama Station

One of the focus areas of the layout, and one of the last to be landscaped. I've roughed in the driveway road and small engine platform to the right. At the bottom will be the suggestion of a small park, with trimmed greenery and perhaps a low stone wall. The station itself is nearly painted, but still needs a lot of detail work. There will be three lights in the building, one for each of the interior room sections.


5) Bridge and Future Site of Kabayama Mine

I've removed the mine structure temporarily to give me some work area on the layout surface. I think this will be one of the last areas I work on, but it will be interesting to see how it comes together, especially working with resin for the small pond. As penciled in, the road will branch and cross the track before heading to a parking lot for the mine.


6) Girder Bridge

Just recently re-laid this track after adding the new turnout. Lots of work to do in this corner.


7) Switch House, Track to Upper Level, and "North" Tunnel Portal

One of the best views of the layout so far, in my opinion. The building is finished, with lots of greenery detail around the base, and a light installed. The portal still needs weathering, and there's a need for some signals to control the approach to the turnout.


8) Upper Runaround Track

Something I should have planned on from the start, since getting any number of cars into the siding at the left is too difficult without it. Lots of room here for small details around the tracks.


9) Future Engine Pocket Track

Another view of the girder bridge, the track will be extended over a small cantilevered extension to allow the engine and 1-2 cars to clear the turnout. In fantasy land, it's the connection of this small local network to the larger railway.


10) Future Freight Drop-off

Intended as a place to leave cars to be picked up by inter-local trains coming in from outside the layout. Might end up leveling the area next to the siding and adding a platform and some buildings, but I don't want to block off the back area too much.

Saturday, July 6, 2013

Adding Greenery

What a difference a little foliage makes.


Thursday, July 4, 2013

Light it up!

Bought a simple Hornby lighting setup, and after adding another turnout to the upper track, tried it out.


Looks great so far! Very easy to set up. I mounted the bulb on a stand of leftover plastic sprue, and used sticky tack to hold everything together. It wires in to the transformer, has a little dedicated fuse, and a separate switch to disable all the lights.

Wednesday, July 3, 2013

Continuation

It's been more than six months since my last post, as lack of money and the requirements of my career suspended work on the layout. Things are more settled now, though, so I can finally get back to work!

Here's a shot of the layout as it stands right now, with most buildings removed. I plan on adding another turnout to the upper track to make a runaround track, otherwise I just have to continue adding ground cover, and finishing the building models.

Monday, January 14, 2013

Yard and Station Area Ballasted


Also added a thin concrete platform between the two station tracks, for moving luggage and other local freight between tracks.

Thursday, January 10, 2013

Ballasting and Station Yard

I'm slowly adding ballast to the track in the front part of the layout. I also raised up the station area with a layer of MDF so that the station platform will be closer to the level of the railhead. I plan on adding a thin layer of plaster in front to smooth out the slope, adding in a dirt driveway area as well.


A ground-level shot, looking 'east' toward the yard area. You can really see how poorly I laid out the straight sections of track!


Overhead shot of the station and yard area. The glue is still very fresh on the bottom section. Decided to plan on adding a very thin platform between the two siding tracks, rather than just ballasting it over, so no ballast there for now.

Thursday, January 3, 2013

Remote Turnout Control

Yesterday I installed the BullFrog remote turnout control. There is one turnout on the layout that is not easy to reach from the front; you have to stand and reach over a hill to switch it, and it links the upper part of the layout with the base level. Installing a turnout control is not an easy thing to do once the turnout and track has been ballasted! I also had to shift one of the beams supporting the MDF baseboard about two inches to one side to even reach the area under the turnout. Needless to say this was not a planned addition, but it's worked out really well so far.

The BullFrog kit comes as a wooden sprue of laser-cut parts, each of which feels quite strong. The pieces come apart very easily and didn't even have to be trimmed to fit together. Assembly is done with wood glue or PVA and was finished very quickly. Although the kit can be assembled so that the switch box ends up to the right or left of the switch wire, depending on where one has space under the layout, the instructions regarding this were a little confusing and I had to check the plans several times to make sure I was putting mine together the way I wanted.


The red and black wires are feeder wires that happened to be attached to the base of the turnout, not involved in the BullFrog. I accidentally pulled one of them out, and will have to solder it back on to the side of the rail in the future. The bottom of the rail, where they normally attach, is completely inaccessible now.

Fitting the assembly to the bottom of the layout, and matching up the switch wire with the turnout level proved difficult, but eventually I had everything lined up, slathered the joint with glue, and stuck in a wood screw from the top to bind it together. In hindsight, it is very difficult to glue anything to the rough side of MDF, and wood screws have to penetrate through the board to have any hold. I think a thin piece of wood added ahead of time would have made things a lot easier, and given me a flat base to attach the assembly to.

I had to order an extension control cord so that the control knob can reach the front side of the layout. Fast Tracks, the company that produces the BullFrog, was great to order from. Right now the switch action is smooth and reliable. I did add candle wax to some surfaces as suggested in the instructions. Hopefully when the extension arrives in a couple weeks, I can finish everything and have it operational.


This is what the topside of the turnout looks like now. The right patch was for a hole I didn't end up using, and the left conceals the top of the wood screw; both of these will be covered up with groundcover. You can just barely see the tip of the wire poking through the left arm of the switch lever.

Tuesday, January 1, 2013

Quick Holiday Update

Just a short post to say that I received a BullFrog Manual Turnout Control kit and am assembling and installing it on the turnout that links the ramp to the main loop. So far, so good, although I had to move one of the structural beams in the table framing to get at the underside of the turnout!